Advanced WordPress Set Up
This article is a stub. You can help the IndieWeb wiki by expanding it.
Advanced WordPress Set up is a set of additional options and/or upgrades that extend the document Getting Started on WordPress.
As in most CMSes, there are many ways to do the same or similar things. While Getting Started on WordPress is meant for general beginners to take the quickest and easiest path to IndieWeb-ifying their personal site, there are additional and alternate options for many of the moving pieces. Many of these can be found below, roughly in the same order as on the getting started page.
Advanced users and developers are more than welcome to browse through these as well as the WordPress/Plugins page. Additional guidance for portions can potentially be found on individual wiki pages for particular pieces of functionality in the IndieWeb Examples sections for members who identify as WordPress/Examples.
Rel-Me
One of the first things you will want to set up are rel-me links to your other profiles on the web. This will enable web-sign-in using RelMeAuth by using your domain as your identity. You can then sign into this wiki and begin wikifying.
Rel-me is usually added as an attribute within an <a> tag, but can also be done within a <link> tag, so either of the following will usually work, however the link version isn't human readable (it won't render on the web page) so you may forget it's there. If you do use link, it may be best done in the page header.
<head>
     <link href="https://example.com" rel="me" />
     ...
</head>
Or like this somewhere on your home page:
<a href="https://example.com" rel="me" />Micro.blog</a>
WordPress sites can add rel="me" classes on links in several locations including:
Indieweb Plugin
Recommended Method, see also details at Getting Started on WordPress
The easiest way to add rel="me" support to your site is to install the Indieweb Plugin. This will add several common social media site fields to your "Edit User" page in the admin panel at yoursite.example.com/wp-admin/profile.php. (Be sure to change this URL to include your particular domain.) Fill these in with the usernames for your identities on the various services you use (Telephone, Github username, Twitter username (without @), Facebook ID, Last.fm username, Instagram username, Flickr username) and the plugin will create the proper (invisible) rel-me links in the head of your site. There is a field at the bottom of the "Edit User" page that one can list additional URLs for adding rel-me to as well. The rel-me and WordPress with Bridgy#Rel-me links pages can provide additional information if necessary.
If you view the source for your website afterwards, you'll see a number of links like <link rel="me" href="https://twitter.com/username" /> in the <head>. If you want the links to be visible on your site, you can use the rel-me widget, which will replace the hidden links with icons.
Directly in the header
Potentially by using a plugin:
- All in One Webmaster has a header/footer text boxes for adding html in the header
- Insert Headers and Footers plugin
Text widget or HTML widget
These can be added to a sidebar, footer, header or other location within a theme.
Social Links Menu
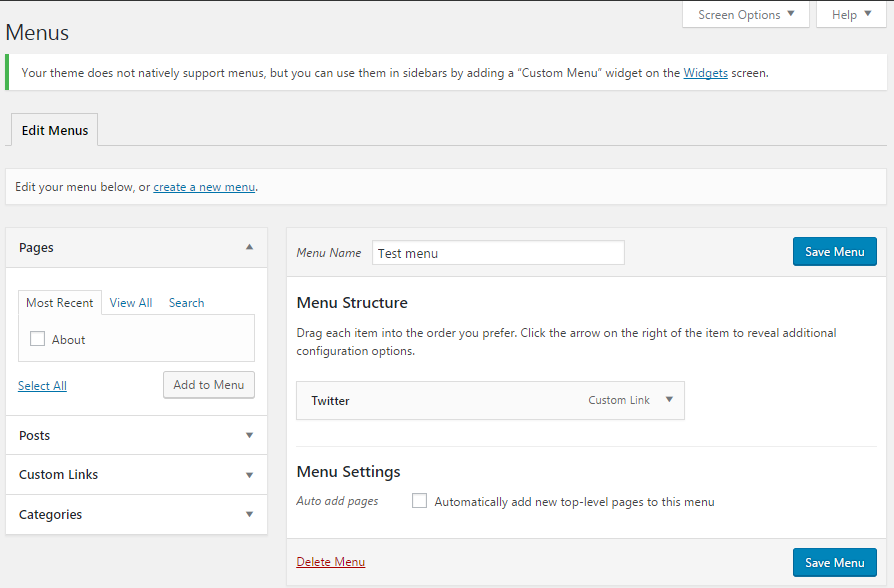
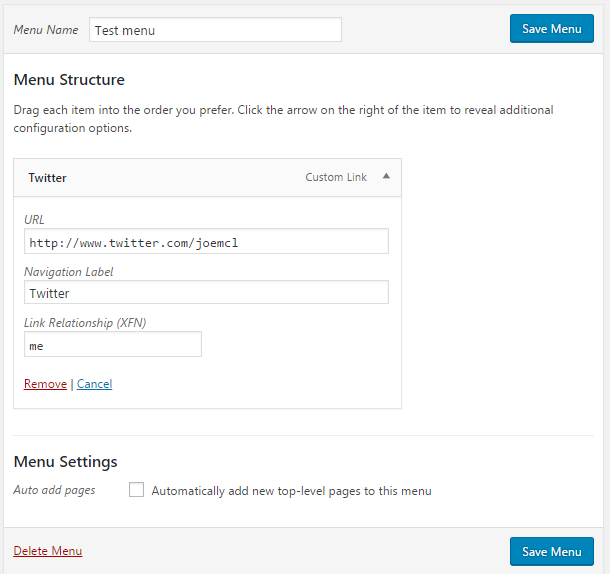
For sites that have a (usually secondary) social links menu, one can add the classes directly into the menu. On your site go to /wp-admin/nav-menus.php to create the menu; you may need to go to "Screen Options" pulldown in the top right corner and check the "Link Relationship (XFN)" option which will reveal a box into which one can simply type "me" to create the rel-me class on the URL. (See details below.)
If you're on WordPress.com using their Business plan or higher, you can use the IndieWeb plugin mentioned above. If not, or if you're using a WordPress.org self-hosted version you'll need to use the WordPress menu and widget system.
- In the admin, go to Appearance > Menus
- Create a new menu
- Click Screen Options at the top and check the box to display Link Relationships (XFN)
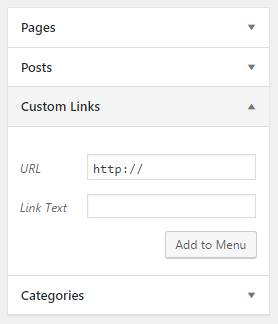
- Click Custom Links and add the link to your profile, e.g https://twitter.com/username. Enter the link text and click Add to Menu. Repeat for as many profile links as you want to add.
- Under Menu Structure click the arrow beside the newly-added link. In the Link Relationship (XFN) field enter me and click Save
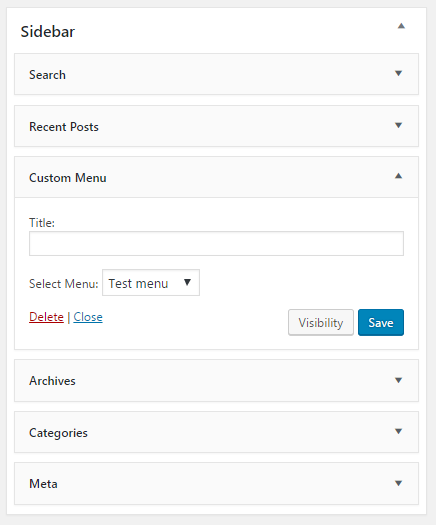
- Go to Appearance > Widgets
- Drag a Custom Menu widget into the Sidebar
- Click the arrow to expand the Custom Menu, select the menu you created, then click Save
- Your profile links should now appear in your sidebar, or wherever your theme places the widget.
Reciprocal links
Now that your site has rel-me links pointing to your presences on several services, log into those services and include the URL of your site in the appropriate website fields of your profile so that they point back to your website in return. Having the ability to add rel-me links in your sites helps to indicate your ownership of them.
Some services like Twitter and Instagram, which only allow one URL in your profile, support putting a second URL into your bio field if you have second personal site. Examples:  Kevin Marks and
  Chris Aldrich have indiewebified primary and secondary sites.
If your site has multiple Wordpress users, and you want to use it as an Indieweb site for one of the users, change the Indieweb identity settings in its "Options" pane:
- click IndieWeb in the admin sidebar
- click Options under the IndieWeb item in the admin sidebar
- In the main window:
- Check: Single Author Site [x]
- Pick yourself in Default Author _____v drop down menu.
- Save Changes
You can now test your rel-me setup with: IndieWebify.Me Web Sign In validator
Nota bene: In late July 2016, IndieWebify.Me was having problems which may cause it to return incorrect results. If you think this may be the case, you can do an additional test described in "Authentication" below.
Pull your content from other sites
If POSSE is not an option or can't be done for various reasons (see Instagram for example), you probably still have the possibility of pulling content (PESOS), automatically creating a "backup" on your site.
Right now the most flexible way to do this on WordPress is the combination of Keyring, Keyring Social Importers, and Keyring Reactions Importer plugins. These are a little harder to configure plugins, mainly targeting semi-power-users, but they can import from an impressive amount of services out of the box and it's straightforward to extend their functionality.
For many other options (like OwnYourGram, Dsgnwrks Instagram Importer, see also WordPress/Plugins
Publish to Your Site with alternative interfaces
- Micropub for WordPress - add support for the Micropub protocol to WordPress. This will allow the use of tools like OwnYourGram, OwnYourCheckin, Quill, and potentially others in the future to post content to your WordPress site.
Other functionalities
- Webactions - Adds webactions markup to WordPress elements
- Indieweb Press-This - Adds Indieweb markup to the WordPress Press-This Bookmarklets to allow you to respond on your site with one-click
- Hum URL Shortener - A personal URL shortener framework
- wp-shortslug - another URL shortener
- Indieauth - The plugin lets you login into sites that support IndieAuth.
For more information, see WordPress Plugins
Themes
Some WordPress themes are compatible with microformats. The Indieweb uses microformats2, the latest version, to mark up sites so that they can be interpreted by other sites when retrieved. Most parsers will fall back onto the older format if available.
Formatting your site so other sites can consume the information allows for the communications Indieweb sites support. For example, a class of u-like-of added to a link to a site you liked to indicates that relationship.
There is only one theme in the WordPress repository that is fully microformats2 compliant. That is Sempress. Independent Publisher also now uses microformats2 in addition to having custom code for better displaying webmentions in the comments section.
For existing themes, you can try out wordpress-uf2, a plugin that tries to add microformats after the fact. Mileage may vary, as a plugin cannot do all that is required. Some themes that use microformats for styling instead of semantic markup may break or have spurious visual outputs when used with the uf2 plugin.
Readers
A reader (or indie reader) is the portion/feature integrated into an indieweb site that provides a way to read content from other indieweb sites, possibly including posts from the current site as well. There are a few for WordPress including:
- Yarns Microsub Server - a plugin that provides a complete Microsub Server implementation for WordPress
- PressForward - plugin that adds an integrated reader with additional features and functions; for additional details on features and installation
- blogroll2email - oldschool feed to email reader using the blogroll feature of WordPress; supports RSS, Atom & microformats2 feeds
- Whisperfollow see Whisperfollow
External reader services can be integrated into WordPress as well including via:
- Microsub servers and Microsub clients
- Using webhooks or various other means


